PSP Go Headphone Jack Replacement Complete Guide
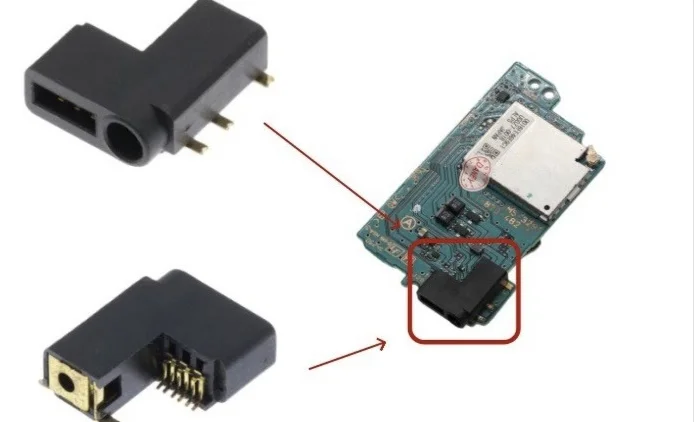
PSP Go Headphone Jack Close-up
Overview
So annoying! PSP Go headphone jack has bad contact! Listening to music, left ear suddenly goes silent, right ear cuts in and out; gaming, sound effects screech like broken cymbals! Now I have to twist and turn the plug to find the right angle, slightest movement causes crackling! What's worse, sometimes it triggers voice control automatically, randomly starts dialing! Should I disturb everyone with speakers forever? No way! Today I must give my PSP Go 'clear ear canals' and restore its heavenly sound!
Required Tools
- Phillips screwdriver (PH00)
- Plastic spudger
- Tweezers
- Soldering iron and solder (if soldering required)
- New PSP Go headphone jack module
- Anti-static wrist strap (recommended)
- Multimeter (for testing)
Safety Precautions
- Power off: Ensure PSP Go is completely powered off and battery disconnected
- Static protection: Audio circuits are static-sensitive
- Soldering safety: Ensure ventilation and fire safety if soldering
- Precision work: Jack components are small, handle carefully
Headphone Jack Specifications
- Type: 3.5mm stereo jack
- Pin count: Typically 5 pins (including detection pin)
- Installation: Soldered or modular
- Location: Bottom left side of device
Fault Diagnosis
Common Symptoms
- Complete silence: Jack completely damaged or open circuit
- Mono only: Only one channel works
- Intermittent sound: Poor contact
- Noise/static: Internal short or contamination
- Detection failure: Speakers don't mute when headphones inserted
Preliminary Testing
- Test different headphones: Rule out headphone issues
- Clean jack: Use cotton swabs and isopropyl alcohol
- Check plug: Inspect headphone plug for bending/damage
- System test: Check system audio settings
Step-by-Step Procedure
Step 1: Remove Back Cover
- Place PSP Go face down
- Remove 4 screws from back cover
- Gently pry open back cover with plastic spudger
- Carefully remove back cover
Step 2: Complete Power Disconnection
- Locate battery connector
- Disconnect battery using plastic spudger
- Ensure device is completely powered off
Step 3: Remove Motherboard
- Remove 6 motherboard mounting screws
- Note screw positions (different lengths)
- Gently lift motherboard
- Disconnect all ribbon cables from motherboard
- Completely remove motherboard, place in safe location
Step 4: Access Headphone Jack
- Headphone jack located on bottom frame
- May need to remove bottom cover or related frame
- Remove screws securing relevant components
- Expose headphone jack module
Step 5: Remove Old Headphone Jack
Case A: Modular Jack (Recommended)
- Locate headphone jack ribbon connector
- Gently lift ribbon lock with tweezers
- Remove headphone jack ribbon cable
- Remove screws securing jack module
- Remove old jack module
Case B: Soldered Jack (More Complex)
- Heat solder joints with soldering iron
- Remove solder with desoldering pump or braid
- Carefully remove old jack
- Clean pads, prepare for new jack
Step 6: Install New Headphone Jack
Modular Jack Installation
- Place new jack module in position
- Tighten mounting screws
- Connect ribbon cable, ensure fully inserted
- Secure ribbon lock
Soldered Jack Installation
- Align new jack with pads
- Hold in place with tweezers
- Solder each pin
- Check solder quality, avoid shorts
- Clean solder joints, remove excess solder
Step 7: Preliminary Testing
- Temporarily connect battery
- Power on, test headphone function
- Insert headphones, test audio
- Test left/right channel balance
- Test insertion detection
Step 8: Reassembly
- Install all related frames and components
- Install motherboard, connect all ribbons
- Connect battery
- Install back cover
- Tighten all screws
Post-Installation Comprehensive Testing
Audio Quality Testing
- Stereo test: Play stereo test audio
- Frequency response: Test high, mid, low frequencies
- Volume test: Test all volume levels
- Balance test: Test left/right channel balance
Function Testing
- Insertion detection: Test speaker muting when headphones inserted
- Contact stability: Test with slight plug movement
- Microphone test: If supported, test microphone
- Remote control test: If supported, test inline controls
Durability Testing
- Multiple insertions: Test insertion/removal durability
- Angle test: Test contact at different angles
- Extended use: Test stability during 30-minute continuous use
Common Issues and Solutions
Issue 1: Still no sound after installation
- Possible cause: Ribbon not connected properly or wrong jack model
- Solution: Recheck connections, verify jack model
Issue 2: Mono only
- Possible cause: Solder short or poor ribbon contact
- Solution: Check solder joints, reconnect ribbon
Issue 3: Static or noise
- Possible cause: Poor grounding or shielding
- Solution: Check ground connection, ensure proper shielding
Issue 4: Insertion detection not working
- Possible cause: Detection pin not connected or faulty
- Solution: Check detection pin connection
Professional Repair Techniques
Soldering Techniques
- Temperature control: Soldering iron 350-400°C
- Time control: Heat each joint ≤3 seconds
- Solder amount: Appropriate amount, avoid excess
- Clean joints: Clean with isopropyl alcohol after soldering
Testing Techniques
- Multimeter test: Test continuity with multimeter
- Audio signal test: Use audio signal generator
- Oscilloscope test: If available, test signal quality
Parts Selection
OEM Parts Characteristics
- Precise dimensions: Perfect fit for PSP Go
- Quality materials: Gold-plated contacts, corrosion-resistant
- Full functionality: Supports stereo and insertion detection
Compatible Parts Selection
- Modular preferred: Choose modular jack for easier installation
- Solder quality: If soldered type, check pad design
- Full functionality: Ensure all necessary functions supported
Preventive Maintenance
Daily Use Recommendations
- Proper insertion: Insert/remove vertically, avoid excessive angles
- Regular cleaning: Clean jack monthly
- Dust protection: Use dust plug when not in use
- Avoid pulling: Don't pull on headphone cable
Fault Prevention
- Check headphones: Regularly inspect headphone plug
- Avoid liquids: Prevent liquid entry into jack
- Temperature control: Avoid extreme temperatures
- Regular testing: Test audio function monthly
Cost-Benefit Analysis
Repair Costs
- OEM jack module: ¥50-100
- Compatible jack module: ¥20-50
- Soldered jack: ¥10-30
- Professional repair: ¥100-200 (including labor)
- DIY time: 45-90 minutes
Repair Value
- Audio experience: Restore perfect audio output
- Device functionality: Maintain complete device function
- Convenience: Enable headphone and audio device use
- Value preservation: Maintain device resale value
Summary
Replacing the PSP Go headphone jack is a technically demanding repair, especially if soldering is required. Proper replacement restores perfect audio quality for gaming and music. Follow this guide's steps, pay attention to safety and technical details, and experienced users can successfully complete the replacement.
Repair difficulty: ★★★☆☆ (Moderate, ★★★★☆ if soldering required)
Time required: 45-90 minutes
Success probability: 85%+ (modular), 70%+ (soldered)
Important reminder: If you lack electronics repair experience, especially soldering, strongly consider modular jacks or seek professional help. Improper soldering can damage the motherboard, causing more serious issues.