PSP Go Logic Board Replacement Complete Guide
PSP 1000 Black Console
Overview
It's over! PSP Go motherboard is dead! Worked fine yesterday, today it won't turn on at all—power button does nothing! Plugging in charger doesn't help, indicator light won't even glow! What's scarier, I smell a faint burnt odor—did the board fry? I have 100 hours of Monster Hunter saves in there! Is my gaming career finished? No way! Today I must give my PSP Go a 'wise heart' and bring it back to life!
Required Tools
- Phillips screwdriver (PH00)
- Plastic spudger
- Tweezers
- New PSP Go logic board
- Anti-static wrist strap (mandatory)
- Anti-static mat (recommended)
- Label paper (for marking ribbon cables)
Safety Warnings
⚠️ Highest Level Motherboard Repair Warning ⚠️
- Static Protection Mandatory: Motherboard is extremely sensitive to ESD; comprehensive protection is essential
- Power Off Operation: Ensure complete power off; battery must be disconnected
- Component Storage: All screws and small components must be properly stored
- Ribbon Cable Caution: All ribbon cables are very fragile; handle with extreme gentleness
- Professional Advice: If you lack electronic repair experience, seek professional assistance
Motherboard Specifications
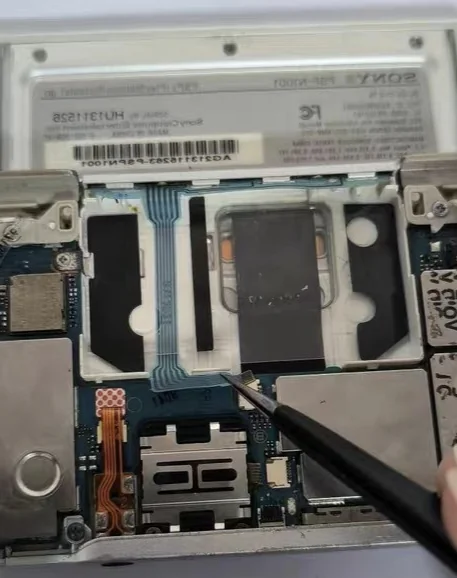 PSP Go motherboard overall view - Note the compact layout design
- CPU: MIPS R4000-based, 1-333 MHz
- GPU: Custom graphics processor
- Memory: 64MB RAM
- Storage: 16GB internal flash memory
- Wireless: Wi-Fi 802.11b
- Bluetooth: 2.0+EDR
Fault Diagnosis
Common Motherboard Failure Symptoms
- Cannot Power On: Completely unresponsive
- Freezes After Power On: Freezes during boot process
- Functional Abnormalities: Partial function failures
- Display Issues: Problems related to display
- Audio Issues: Audio-related faults
- Charging Problems: Unable to charge or abnormal charging
Preliminary Troubleshooting
- Power Test: Test power board and battery
- Screen Test: Rule out screen issues
- Peripheral Test: Test if other components are normal
- System Recovery: Try system recovery mode
Detailed Steps
Step 1: Complete Discharge and Preparation
- Completely power off PSP Go
- Disconnect all external devices
- Lay anti-static mat on workbench
- Wear anti-static wrist strap and connect to ground
- Prepare label paper to mark all ribbon cables
Step 2: Remove Rear Cover
- Place PSP Go face down
- Remove 4 screws from rear cover
- Use plastic spudger to gently pry open rear cover
- Carefully remove rear cover
Step 3: Disconnect All Power
- Disconnect battery connector
- Disconnect all other power connections if present
- Ensure device is completely powered off
Step 4: Mark and Disconnect All Ribbon Cables
Important: Before disconnecting each ribbon cable, mark position and orientation with label paper
- Screen Ribbon Cable: Mark as "Screen"
- Button Ribbon Cable: Mark as "Buttons"
- Speaker Ribbon Cable: Mark as "Speakers"
- Wireless Antenna: Mark as "Wireless"
- Other Ribbon Cables: Mark each individually
Use tweezers to gently lift each ribbon cable latch, carefully remove ribbon cables
Step 5: Remove Mounting Screws
- Motherboard is secured by multiple screws
- Use Phillips screwdriver to remove all screws
- Critical: Store screws by position
- Record each screw's position and length
Step 6: Remove Old Motherboard
- Check for any remaining unconnected connections
- Gently lift one corner of motherboard
- Slowly remove motherboard from frame
- Be careful not to touch any components
- Place old motherboard in anti-static bag
Step 7: Install New Motherboard
- Remove new motherboard from anti-static bag
- Check new motherboard for obvious damage
- Align new motherboard with mounting position
- Gently place into frame
- Ensure all interface positions are aligned
Step 8: Install Mounting Screws
- Follow recorded screw positions
- Tighten screws from center outward
- Avoid over-tightening
- Ensure motherboard is installed flat
Step 9: Reconnect All Ribbon Cables
Reconnect According to Marks:
- Screen Ribbon Cable: Carefully insert, secure latch
- Button Ribbon Cable: Ensure correct orientation
- Speaker Ribbon Cable: Connect securely
- Wireless Antenna: Connect properly
- Other Ribbon Cables: Connect each individually
Step 10: Connect Power
- Connect battery ribbon cable last
- Ensure secure connection
- Check for short circuit risks
Step 11: Preliminary Testing
- Temporarily don't install rear cover
- Power on to test basic functions
- Check for abnormal conditions
- If normal, proceed to next step
Step 12: Final Assembly
- Install rear cover
- Tighten all screws
- Check if appearance is even
Post-Installation Comprehensive Testing
Basic Function Testing
- Power On Test: Test normal power on
- System Test: Enter system to test all menus
- Display Test: Test screen display
- Audio Test: Test speakers and headphone
Hardware Function Testing
- Button Test: Test all button functions
- Analog Stick Test: Test analog stick
- Wireless Test: Test Wi-Fi connection
- Storage Test: Test internal storage
- Charging Test: Test charging function
Performance Testing
- Game Testing: Run demanding games
- Video Testing: Play HD video
- Multitasking Test: Test system stability
- Temperature Test: Monitor operating temperature
Durability Testing
- Extended Operation: Continuous operation for 2 hours
- Multiple Restarts: Test restart stability
- Stress Test: Run performance testing software
Common Issues and Solutions
Issue 1: Cannot Power On
- Possible Causes: Power connection issues or motherboard failure
- Solution: Check all power connections, confirm correct motherboard model
Issue 2: Partial Function Failure
- Possible Causes: Ribbon cables not properly connected or motherboard compatibility issues
- Solution: Recheck all ribbon cable connections
Issue 3: System Errors
- Possible Causes: Motherboard firmware issues or hardware incompatibility
- Solution: Try system recovery, check motherboard version
Issue 4: Overheating Issues
- Possible Causes: Heat dissipation issues or motherboard failure
- Solution: Check heat dissipation components, ensure proper installation
BIOS/Firmware Considerations
Motherboard Version
- Model Matching: Ensure new motherboard model matches original
- Regional Version: Note different regional motherboards may have variations
- Firmware Version: New motherboard may require firmware update
Data Migration
- Internal Storage: New motherboard's internal storage is empty
- System Settings: Need to reconfigure system settings
- Game Saves: Can restore if backups exist
Professional Repair Techniques
Static Protection
- Full Protection: Maintain static protection from start to finish
- Environmental Control: Be extra careful in low humidity environments
- Tool Grounding: Ensure all tools are grounded
Component Management
- Photographic Documentation: Photograph all connections before disassembly
- Categorized Storage: Store screws and small components by category
- Sequential Operation: Follow sequence strictly
Cost-Benefit Analysis
Repair Costs
- Original Motherboard: ¥300-600 (depending on version and condition)
- Compatible Motherboard: ¥200-400
- Repaired Motherboard: ¥150-300 (repaired units)
- Professional Repair Labor: 2-3 hours
- DIY Repair Risk: High
Repair Value Assessment
- Device Value: Current market value of PSP Go
- Sentimental Value: Special meaning of device to you
- Functional Needs: Your functional requirements for device
- Replacement Cost: Cost of purchasing new device
Summary
Replacing PSP Go logic board is one of the most difficult repair tasks, requiring extremely high technical skill, attention to detail, and patience. Motherboard replacement is equivalent to giving the device a "brain transplant"; success directly affects the device's survival. Consider motherboard replacement only when all other repair methods have failed.
Repair Difficulty: ★★★★★ (Extremely Difficult)
Required Time: 2-3 hours
Success Probability: 70% for experienced, below 30% for beginners
Final Recommendation: Unless you have extensive electronic repair experience and the device has special value to you, do not attempt motherboard replacement yourself. The risk of motherboard replacement failure is high and may result in complete device destruction. For most users, we recommend: 1. Seek professional repair services 2. Consider purchasing used complete unit 3. If device value is low, consider upgrading to new device
If you decide to attempt it yourself, ensure thorough preparation, follow this guide strictly, and be mentally prepared for possible failure.